Originally, our plan was to go with this flooring from Lumber Liquidators, but after reading too many reviews about how easily it scratches and dents we opted to upgrade to what's called a strand bamboo. Something about the "stranding" process is supposed to make the bamboo extra durable, 150% harder than oak is what they claim. The guy at Lumber Liquidators said you could drop a hammer on it and it would be fine, now that's more what we're looking for!
Installing the first row was by far the most time consuming (and nerve wracking!) to make sure we got it a straight as possible.

There was a bit of a learning curve to using the floor nailer (the hardness of the bamboo did have a downside when it came to actually installing it!), but once we got the feel for it it worked pretty well. By the end of the first day our floor looked like this.

It surprised us how well the floor blended with the log walls. We were actually hoping for a bit more contrast, but we'll still get that when we add the kitchen cabinets.
So after 3 1/2 days of pretty constant work by Travis our downstairs now looks something more like this

and this

and this.

Slight improvement wouldn't you say? It's so exciting to be getting to some of the more aesthetically pleasing projects versus some of the more mandatory, but less beautifying things like plumbing and electrical!


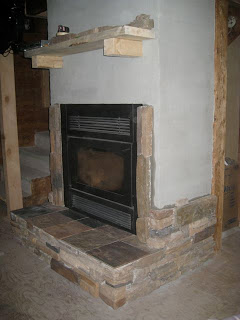
 But since then Travis built and plywood frame around it following code requirements (we were able to safely do this since our stove is what's considered zero clearance), as well as built and installed a sweet mantle milling the lumber himself with his Alaska mill (more on that to come, but since it's Travis' project I thought it'd let him write it).
 After wrapping the frame with wire mesh like this:


 As for color, we went with the same shade of red that we used in the rest of the kitchen, Ralph Lauren Pomegranate.
  We love the color. It is a little dark right now having it on all the walls in such a small space, but eventually a lot of it will be covered up with nice light colored cabinets so it should balance out perfectly. For now it's a great feeling to be able to cross one more thing off the to do list!


 It keeps things light and neutral while giving us the option to add pops of color down the road as we get more of a direction for where we want it to go with the decor. But for now I am in love with having a SINGLE color on the wall. What a novel concept! lol
 And THIS is what it looks like now! I am thrilled with the change. I can actually see what I have now and I think (hope) it will be fairly easy to maintain. The tub on the left contains my big bulky fabric (like the 12ish yards of wool I scored at a yard sale for only $5 this summer!), blankets that have been donated to my fabric pile for repurposing, batting, and my small bit of yarn in the little green box. The tub on the right is what I'm most proud of though.
 I bought a box of 2.5 gallon zippy bags and sorted my fabrics by color, so for the most part each bag holds a different color fabric. So instead of rifting through a big tub of fabric, I simply have to pull out the baggy of the color I'm looking for while the rest of my tub of fabric remains undisturbed. This part I didn't plan, but I was delighted to discover that the bags fit perfectly in my 20 gallon tub so I was able to line them up on end making it even easier to sort through them.

 Then one afternoon we got a fit of inspiration and decided to tackle it. So with a bit of muscle, some pounding and a lot of supporting we transformed our stairway from ugly makeshift beams to beautiful, permanent ones.
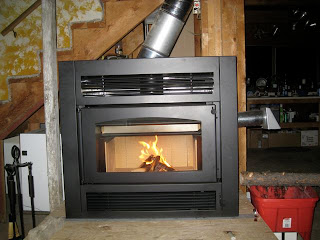
 The new fireplace requires zero clearance, so Travis has been working on building a frame around it to hide the stove pipe and one day (hopefully one day very soon) it will be covered with ledgestone and tile.
 It looks better already, don't you think?


 For future reference, November in McCall is not the best time of the year to be working on a tin roof. Despite the cold, snow and rain, however, we (i.e. Travis) were able to get the north side of the roof finished with the generous help of some friends before the snow really set in for the season.
  The south side will have to wait till spring for it's makeover, but it doesn't have any leaks in it so it's not such a big deal. It will be exciting once the snow melts this spring to actually be able to see and enjoy our new pretty green roof!